 |
|
#101
|
|||
|
|||
|
Nice progress. Those Faria Chesapeake gauges look nice. I am back and forth on those in white or the Newport SS. How do you like the switches bracket holder thingy? I was thinking of just mounting individual contoura switches, but that bracket looks clean and neat too. Did it make it easier to install?
|
|
#102
|
|||
|
|||
|
The guy told me white is most popular, black second. The CNO insisted on this one. Something about the teak and gauges complementing each other. Fine with me…she designs it, I build it.
Love the switch bracket. You have fudge factor that way for the bracket. It’s the blue sea one on Amazon. Only thing is it’s only 6 but I’m pretty happy with it. The switches have a very positive locking into place and work well. I wanted to do plain into wood. If I did that I’d do the toggles vs rockers. Labeling becomes your issue then. I tried rockers straight into the teak. I broke a board by pressing it in too hard. Mine is 1/2” space between the lip of one to other. I can supply measurements or whatever for you if it helps. |
|
#103
|
|||
|
|||
|
Great, thanks. 6 works for me and can always move the horn button or something to on its own if need be.
|
|
#104
|
|||
|
|||
|
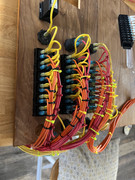
So I think I finally have the helm finished with wiring.
This only the items that are not switched (vhf, fishfinder, stereo) will have their own switches on the device but fused through the power supply. This took a little bit of work. But my OCD is pleased. It should be easy to install and troubleshoot should I need to You can see I daisy chained the grounds on a row with light loads. However the top row with bilges, PTT, and cig lighter adapters are individually grounded. I used 12awg for grounds. And mainly 14 awg for the rest but some 12 in app loads. For clarity Red is fuse block to power on switch. The orange is switch to load. I plan to put them near each other. The wires are in same order as switch rows and should be able to install them in corresponding order, hopefully.         
|
|
#105
|
|||
|
|||
|
That's nice!!
|
|
#106
|
|||
|
|||
|
So now that the engine is “done”
I’m going to focus on cutting the keyhole in my transom. This is very stressful to me for some reason. Any ideas in regards to the x dimension would be helpful. Once I get that done I’ll install my transom assy thank you island trader! Then it’s on to the engine mount blocks and rebuilding the b3 I’m leaning towards rebuilding it with some good used lower driven gears And a brand new set of uppers with cone clutch etc. I’m leaning towards 2:1 Ratio but toyed with 1.81…suggestions appreciated. In meanwhile I’ve got design plans for a teak engine cover, teak rocket launcher over fuel hatch (lowest priority at moment), cabin to finish (teak bulkheads to fit, cushions, under sole work to do batts etc) and lots of things to wire up. |
|
#107
|
|||
|
|||
|
So here is a link for the template cutout for the bravo (I believe alphas too)
http://download.brunswick-marine.com...m/79135006.pdf I did download this off of scribd too. If anybody needs it pm me and I’ll send to you. If you take the file to a local copy center (I did OfficeMax), they can print it out for you. Make sure they don’t do the auto fit. Tell them you need exactly as is for cutting out the hole to correct size. I printed it out on 8.5x11’s first. Cut them and taped them up. Compared that to my assy. Then went with that to the copy center and compared the printout. My Seafari is 16deg transom angle. There is conflicting data out there but from this drawing it looks like 14 5/16” up from bottom of keel. There is also a measurement of 13 9/16 but I believe that is off the carpenter square. In either case I’m raising mine anyway…probably 2” |
|
#108
|
|||
|
|||
|
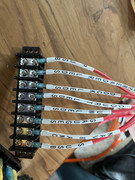
What labelmaker did you use to print on heat shrink?
|
|
#109
|
|||
|
|||
|
I used a plain old dymo label printer. Bought some years back at OfficeMax. Make sure it can do vertical printing instead of horizontal and I increased the font and used caps. Something like this
https://www.amazon.com/DYMO-LabelMan...%2C222&sr=1-11 I used this for the heat shrink labels: Aonomi Compatible Label Tapes Replacement for DYMO 18055 1/2" Heat Shrink Tube Labels for Use with DYMO Industrial Rhino 4200 5200 5000 6000 Label Maker, Black on White,3-Pack https://a.co/d/2ySxMWI I needed 2.5 cartridges for all that. I’d recommend the 3 pack for sure. Then just buy whatever size your label maker uses, 1/2” was mine I think. |
|
#110
|
|||
|
|||
|
I'm in the process of wiring my 20' project and got the Dymo 4200. FWIW, Dymos idea of shrink tube size is way off the mark and apparently does NOT reflect the inside diameter. A 3/16" drill bit will barely fit inside 1/4" shrink label.
|
 |
|
|